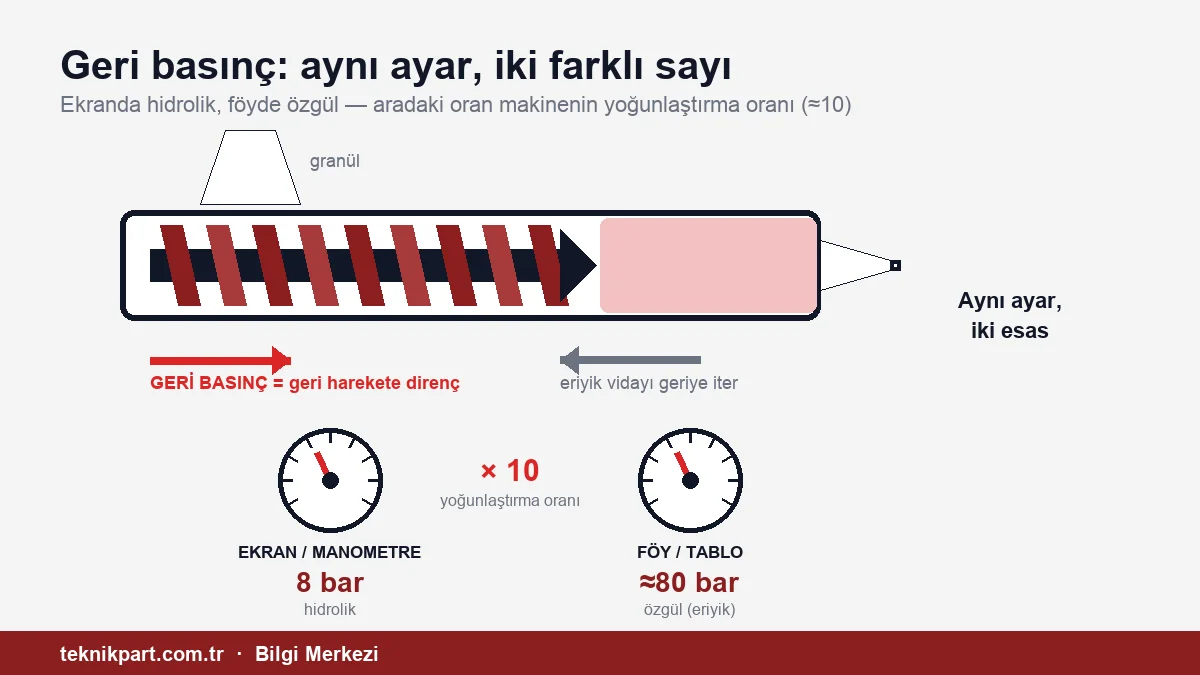
When we shared our material processing values table, a warning came from the shop floor: "Were the back pressure values given as specific pressure? If they are screen parameters, they are very high." The warning was justified, and from that day on we tightened the footnotes in the table. The second comment that followed was even more instructive: raw material manufacturers, machine manufacturers and trainers always give a wide range for this value; the reader takes the top of the range to be "safe" and goes there, whereas on the machine back pressure ranges between 3–15 bar depending on the material, and every step above that is paid for in several separate items. This article was built around those two comments, and each of its claims was checked against manufacturers' datasheets and the industry literature: first the concept, then the two different numbers that describe the same thing, then why the range is misleading, and finally the cost of going too high.
What does back pressure actually do?
During the metering stage of the injection cycle the screw rotates, carries the granulate forward, and melt accumulates at the screw tip. The accumulating melt pushes the screw back. Back pressure is the resistance deliberately applied to this backward movement of the screw. On a hydraulic machine this resistance is created by throttling, with the return valve, the oil draining from the injection cylinder during metering. On an all-electric machine it is provided by the torque limit of the injection servo that holds the screw axially; it is not the motor that turns the screw that brakes, but the one that pushes it forward and back.
As the resistance increases, the screw comes back more slowly and the melt is compressed for longer and under higher pressure. This has three concrete effects:
- Melt density and shot consistency. This is the real job of back pressure: it compresses the melt in front of the non-return valve and keeps its density the same from cycle to cycle. Because part weight is the product of melt density and volume, the cushion and part weight cannot be stabilized until the density is stabilized.
- Expelling air. The air trapped between the granules is compressed backward, toward the hopper, and expelled; the chance of air-related silver streaks falls.
- Homogeneity. Temperature and viscosity differences decrease; masterbatch and additives are distributed more evenly in the melt.
The order is deliberate. Back pressure is a consistency tool; it is not a defect-fixing tool. The most common thing done on the shop floor is to "cover up" a defect by raising the back pressure; the defect disappears but its root cause stays in place and the cost comes out somewhere else.
The same word, two different numbers
Back pressure is expressed on two different bases, and this is the source of the confusion.
| Hydraulic back pressure | Specific (melt) back pressure | |
|---|---|---|
| What it measures | The oil pressure in the injection cylinder | The pressure the melt sees at the screw tip |
| Where it appears | Always on the pressure gauge; on the screen of most conventional hydraulic controls | In raw material datasheets and textbook tables; on the screen of all-electric machines |
| Typical range | 3–15 bar, upper limit usually 20 bar | 50–150 bar (European datasheets), 35–70 bar (US practice) |
| The link between them | Specific ≈ hydraulic × intensification ratio | Datasheets typically assume a ratio of 10; on today's machines it varies between 6 and 43 |
Because the injection piston is wider than the screw, 1 bar on the oil side appears on the melt side multiplied by the machine's intensification ratio. Raw material datasheets assume this ratio to be 10; one manufacturer's datasheet gives both bases in a single sentence: "specific 100 ± 50 bar, hydraulic mostly 5–15 bar". The ratio is written in the machine's documentation; if you do not know it, you find it by dividing the maximum specific injection pressure by the maximum hydraulic pressure. This multiplier is industry practice, not indisputable physics; because the direction of force is reversed in back pressure, the exact value comes from the machine's own calibration. The "3–15 bar" warning from the shop floor describes the screen value; the column on our material processing values page, on the other hand, is given on a specific basis. Putting the two numbers side by side and writing one in place of the other is exactly the mistake this article is trying to prevent.
The basis on which the screen works varies from machine to machine. The pressure gauge always shows oil pressure. On conventional hydraulic controls the screen is also mostly the hydraulic value; but some hydraulic machines and controls that apply the ratio conversion let you set and display back pressure directly in specific bar. On all-electric machines there is no hydraulic cylinder, so the value is always melt pressure; the force is measured from the load cell behind the screw or from the servo torque. An operator moving from a hydraulic machine to an all-electric one who sets it with the same "10 bar" habit will have entered a value ten times too low. The practical way to tell is this: if the upper limit of the back pressure field is around 20–30 bar you are on the hydraulic scale, and if it is above 300 bar you are on the specific scale. Do not carry the old machine's value over to the new one until you are sure.
Why is a wide range misleading?
Raw material manufacturers, machine manufacturers and trainers give different, and wide, bands for the same material; something like "20–60". There is a reason for this: the correct value depends on screw geometry, granule shape, regrind ratio, color loading and the target metering time, and a single number fits none of them. But the range itself carries a trap. The range does not say on which basis it is given; it does not say whether the bottom or the top is the starting point; it never says what going to the top costs. What happens on the shop floor is this: the operator sees the range, is reassured by "I'm within the upper limit" and keeps the value high even though it is not needed. Our table could have been read this way too; that is why we give the bands below with their basis, their screen equivalent and their rationale. A range is not a permission but a starting point: you go in at the bottom, and only go higher if there is a concrete symptom. In a systematic optimization study it was found that the window giving consistent results was only 35–50 bar wide on a specific basis; the 100 bar band on the datasheet is far wider than this window.
The difference between material groups, however, is more important than the number:
| Material group | Specific back pressure | On screen (for a ratio of 10) | Source and rationale |
|---|---|---|---|
| Heat-sensitive: POM | 0–20 bar | 0–2 bar | Manufacturer's guide; excessive shear releases formaldehyde |
| Heat-sensitive: PVC | — | 1–5 bar | PVC processing guide; shear heat releases HCl, which attacks steel |
| Polyolefins: PE, PP | 35–70 bar | 3.5–7 bar | Manufacturer's guide; low viscosity, little resistance is enough |
| Engineering plastics: ABS, PC, PA, PBT | 50–150 bar | 5–15 bar | Manufacturers' datasheets; the middle band for homogeneity and color dispersion |
| Glass-fiber PA6 | — | at most 3.5 bar | Manufacturer's datasheet; to limit fiber breakage |
| High temperature: PEEK | 20–50 bar | 2–5 bar | Manufacturer's guide; lower for fiber-filled grades |
The specific values are taken from the column on the material processing values page verified against manufacturers' datasheets, and the hydraulic values from guides that give them directly on a hydraulic basis. The screen equivalent is derived assuming a ratio of 10; check your own machine's ratio in its manual.
The cost of going too high: five items, all delayed
The interesting thing about raising back pressure unnecessarily is that the cost is not seen immediately. The part comes out well that day; the bill arrives weeks later. The comment from the shop floor listed this bill in four items; when checked against the sources, the mechanism of two turned out to be different from what was thought, and one item was added.
1. Longer metering, higher speed, degradation
As back pressure increases, the screw comes back more slowly; the metering time lengthens. At this point a widespread belief needs correcting: at constant screw speed, raising back pressure does not on its own raise the melt temperature significantly; this has been shown by measurement. The real source of heat is screw speed. The cost comes indirectly: as metering lengthens, the operator increases the speed to catch up with the time, and that is when the shear heat climbs. This temperature, rising independently of the barrel heaters, does not show on the screen; you only see it if you measure the melt itself at an air shot. The result is a picture of degradation in which production looks good but the part becomes brittle and its color shifts; burn marks and unexpected breakage in mechanical testing often come this way. With heat-sensitive materials the chain is shorter: formaldehyde is released from POM and hydrogen chloride from PVC; manufacturers' guides deliberately keep back pressure low for these two materials. Long metering also lengthens the residence time in the barrel; with sensitive materials this alone is enough for degradation.
2. The load on the screw, check ring and barrel
The check ring and the screw tip — known on the shop floor simply as the ring and the tip — are the two fastest-wearing elements under any conditions; the melt passes over both of them throughout metering. With abrasive material, that is glass-fiber and mineral-filled grades, the load and slip on the ring and the screw tip increase as back pressure and speed rise. The symptom is insidious: the cushion stops holding, the shot weight starts to fluctuate, and the operator raises the back pressure a little more for the same melt quality; compensating for a worn valve with back pressure accelerates the wear. The causes and measurement method are in the screw and barrel wear article; what to do when the clearance reaches its limit is in the screw and barrel refurbishment decision article.
3. Premature aging of the hydraulic oil
On a hydraulic machine, back pressure is produced by throttling the oil in the return line with a proportional valve; every bar throttled turns into heat and warms the oil throughout metering. A common rule of thumb says that every 10 °C increase above 60 °C roughly halves oil life; the ratio may differ in modern formulations, but the direction is the same. Hot oil oxidizes faster and its viscosity falls; the first symptoms are small leaks starting at the valves and pistons, followed by hardening seals and sealing elements. Oil life shortens and unplanned downtime follows. This item does not exist on all-electric machines; on servo-driven hydraulic machines it appears as cooling load.
4. Energy: indirect, not direct
On the shop floor it is observed that the electricity bill rises when back pressure goes up. Published measurements say something interesting, though: back pressure itself does not significantly change plasticizing energy; it is screw speed that determines the energy. The bill comes from the chain in the first item: the speed raised to make up for longer metering also pulls the energy up. In other words, lowering back pressure on its own does not save energy; achieving sufficient homogeneity with low back pressure and low speed does. This view makes sense together with the "measure kWh/kg" recommendation in the energy consumption article.
5. Cycle time
Metering normally finishes within the cooling time and adds no load to the cycle. If metering lengthened by back pressure exceeds the cooling time, the machine waits for metering to finish before opening the mold, and the cycle lengthens. The industry rule is clear: metering must never exceed the cooling time and should be completed about 2 seconds before the cooling timer ends. Metering time is not a setting but a result; if it varies by more than 5% from shot to shot, the process is unstable. Details are in the cycle time article.
When is raising it justified?
Back pressure is a solution tool, not a default setting. There must be a concrete symptom to raise it:
- Color streaks, lines or dispersion differences. If the masterbatch is not mixing sufficiently into the melt, back pressure is the first step; manufacturers' guides point to sufficient back pressure together with medium speed as the way to improve mixing. But check the dosing ratio first; too much masterbatch means more residue and harder dispersion. Gravimetric dosing keeps the ratio constant and reduces the work loaded onto back pressure.
- Air-related silver streaks. If the screw comes back too fast and without resistance, it draws air in front of it; back pressure eliminates these streaks. If the source is moisture, it does not; moisture streaks are solved by drying, not by back pressure. Raising back pressure without making this distinction masks the moisture and makes the screw pay the cost.
- Shot weight and cushion fluctuation. If the melt density is changing, a slight increase brings back consistency; a slight rise in shot weight at the same stroke is normal, because the melt is denser. First make sure the check ring is not worn.
- Low-bulk-density regrind. Poorly cut or light regrind granules cause feed instability and screw slip. The reflex of raising back pressure here is widespread but wrong; the sources look for the solution in the feed zone: the hopper, the rear zone temperature and the regrind ratio. Back pressure does not compensate for this problem.
With fiber-reinforced material, back pressure is a last resort even if these symptoms are seen; manufacturers' guides explicitly ask for fiber-filled grades to be processed with low back pressure, because shear breaks the fibers. Glass fiber marks and loss of strength are the cost of broken fibers.
The right order for setting it
1. Start from the bottom limit of the manufacturer's datasheet. If the datasheet gives a specific value, convert it to the screen value with your machine's ratio. General floor: about 5 bar and above on a hydraulic basis, around 50 bar on a specific basis; lower for heat-sensitive materials, but not zero. 2. The one-parameter rule. In the round in which you change back pressure, do not touch any other setting; otherwise you cannot know what worked. 3. Small steps. The common step on the shop floor is 1–2 bar on a hydraulic basis and 10–20 bar on a specific basis. Wait at least ten cycles after each step. 4. Compare metering time with cooling time. If metering is approaching the end of cooling, stop; also check the residence time in the barrel with the residence time calculator. 5. Measure the melt temperature. At an air shot, preferably with an infrared thermometer or camera; a needle probe reads inconsistently even if preheated. The difference between the set value and the measured value is the shear heat; if it is growing, look at the speed first. 6. Weigh ten parts. If the weight distribution does not narrow, the increase is not working; take it back. 7. Set decompression separately. The pressure remaining in front of the screw at the end of metering causes drool at an open nozzle; decompression removes it. But decompression must not exceed 1.5 times the check ring stroke; more than that draws air into the melt and comes back as bubbles. 8. Record it. The material, color, regrind ratio and the value found are written down together; the next commissioning starts from this record.
Screw speed is the second parameter that, together with back pressure, determines melt quality, and it is the dominant one on the heat side; the screw speed calculator gives the material's peripheral speed limit. If the shear heat is high, lowering the speed first, and if homogeneity is insufficient, raising the back pressure slightly, is the order that emerges from the measurement results in the sources. Changing both at once only moves the problem somewhere else.
Frequently asked questions
Can back pressure be zero? In practice, no. At zero the screw slips back freely, air remains in the melt and the shot weight fluctuates. Manufacturers' guides give about 5 bar on a hydraulic basis and around 50 bar on a specific basis as the floor; for heat-sensitive materials this floor is lower but still not zero.
Is the value I see on the screen hydraulic or specific? The pressure gauge shows oil pressure. The screen depends on the control: mostly hydraulic on conventional hydraulic machines, and melt pressure on some hydraulic machines and on all all-electric ones. Because the unit is bar in both cases, you cannot tell from the screen; look at the upper limit of the field — around 20–30 bar means the hydraulic scale, above 300 bar the specific scale.
How much can I raise it for color dispersion? Until the symptom disappears, in small steps and without the metering time exceeding the cooling time. The increase needed for color is usually a few bar on the screen; beyond that, the dispersion problem is related not to back pressure but to the masterbatch ratio, carrier compatibility or screw geometry.
Couldn't I lower the screw speed instead of back pressure? The two do different things. Screw speed determines shear rate and heat; back pressure determines compression and density. If shear heat is high, lowering the speed first, and if homogeneity is insufficient, raising the back pressure slightly, is the right order. Don't change both at once.
If there is a material for which you are unsure about the back pressure setting, or if check ring and screw wear have reached their limit, our technical support team assesses the process and the spare parts side together.
Frequently asked questions
Can back pressure be zero?
In practice, no. At zero the screw slips back freely, air remains in the melt and the shot weight fluctuates. Manufacturer guides give a floor of about 5 bar on a hydraulic basis and around 50 bar on a specific basis; with heat-sensitive materials the floor is lower, but it is not zero.
Is the back pressure I see on the screen hydraulic or specific?
The pressure gauge shows oil pressure. The screen depends on the control: on classic hydraulic machines it is mostly hydraulic, on some hydraulic machines and on all all-electric machines it is melt pressure. Because the unit is bar in both cases, you cannot tell from the screen; if the upper limit of the setting field is around 20–30 bar it is the hydraulic scale, if it is above 300 bar it is the specific scale.
How far can I raise back pressure for color distribution?
Until the symptom disappears, in small steps and without the plasticizing time exceeding the cooling time. The increase needed for color is usually a few bar on the screen; a distribution problem beyond that is related to the masterbatch ratio, carrier compatibility or screw geometry.
Could I lower the screw speed instead of the back pressure?
The two do different things: screw speed determines shear rate and heat, back pressure determines compression and melt density. Measurements show that screw speed dominates melt heat; if shear heat is high, the right order is first to lower the speed, and if homogeneity is insufficient, to raise the back pressure slightly.