You have a part design and you want to produce it. The first question is often "which machine should I buy"; yet that is not the right order. First the questions which methods does the geometry of the part make possible, then which of these does the planned quantity make economical need to be answered. Machine selection comes after these two answers.
This article sets out that order for those starting production from scratch or bringing a new part into production.
How many ways are there to produce a plastic part?
Geometry narrows the options, quantity chooses between them:
| Method | Typical part | Economical quantity | Tooling cost | Dimensional precision |
|---|---|---|---|---|
| Injection molding | Complex, tight-tolerance, series part | Above 5,000 | High | Tightest |
| Extrusion | Continuous profile, pipe, sheet, film | Measured by the meter | Medium | Good in cross-section, free in length |
| Blow molding | Hollow container, canister, bottle | Above 10,000 | Medium-high | Medium |
| Thermoforming | Thin-walled container, packaging, interior lining | Above 1,000 | Low | Wide |
| Rotational molding | Large-volume hollow body | Above 100 | Low | Wide |
| Machining / 3D printing | Prototype, single or very low quantity | 1 – 500 | None | Tight (depending on method) |
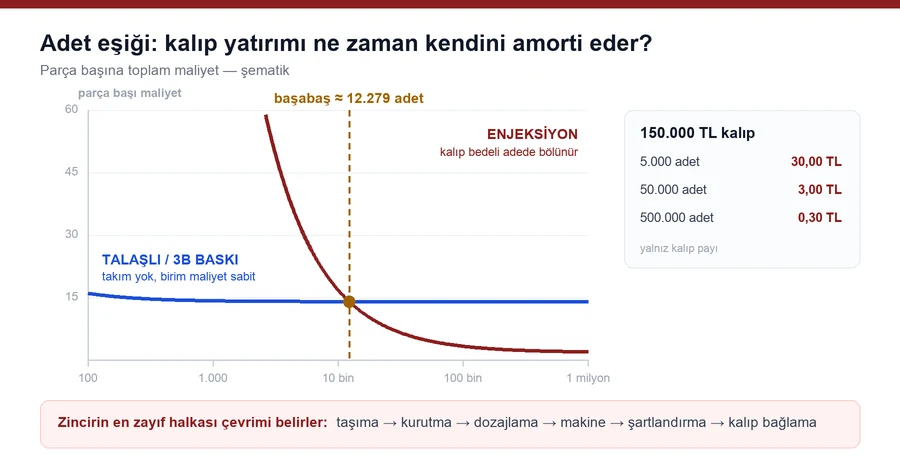
The point that is missed in the table is this: at low quantities no molded method is economical. Having a mold made for a 200-piece job pushes the cost per part above that of machining. By contrast, at 100,000 pieces the mold cost per part falls to fractions of a cent and injection molding has no rival.
Why are most parts produced by injection molding?
Four reasons together:
- Complex geometry in a single step — threads, clips, ribs, thin walls and different cross-sections come out in the same cycle
- Repeatability — the ten-thousandth part has the same dimensions as the first; the assembly line demands this
- Cycle time — measured in seconds, and multiplied by the cavity count of the mold
- Suitability for automation — part removal, sorting and packing are set up on the same line
For the method itself and the working principle of the machine, see our what is an injection molding machine article; the subject here is not how the machine works but how production is set up.
The real investment item: the mold
The price of injection molding is the mold. The things that determine the price of a mold are different from those of a machine: cavity count, the complexity of the part, whether there are core movements, steel grade, surface treatment and the expected life.
The quantity threshold calculation is simple: divide the mold price by the planned total quantity. When a mold costing 150,000 TL is divided over 50,000 parts, 3 TL is added per part; when the same mold is divided over 500,000 parts, it falls to 0.30 TL. This figure, together with raw material and machine hour, gives the real part cost — to see it item by item, you can use the part cost calculator.
Three items often missed when deciding: mold trial time, scrap in the first production and periodic maintenance of the mold. All three come on top of the mold price.
What determines the machine?
Once the mold is clear, the machine is chosen — not the other way round. The determining factors:
- Clamping force — found by multiplying the area falling on the mold parting plane by the cavity pressure the material requires (clamping force calculator)
- Injection volume — the shot weight should stay within the 20-80% band of the screw capacity
- Mold dimensions — tie bar clearance, opening stroke, minimum mold height
- Drive type — determined by the number of shifts and the energy cost
Tonnage ranges overlap between series; what decides is the application. The series comparison and selection criteria are in the how to choose a machine article, and the model list on the plastic injection molding machine models page.
Production is not just the machine
This is the most common mistake in a first investment: the machine is budgeted and the links beside it are left for later. Yet most of the variables that determine the quality of the part are outside the machine.
| Link | What happens if it is skipped |
|---|---|
| Material conveying | Manual feeding; contamination, moisture pick-up and stoppages |
| Drying | Silver streaks, bubbles and loss of strength in hygroscopic material |
| Dosing | Color deviation and wasted masterbatch |
| Mold temperature control | Dimensional drift, warpage, lengthening cycle |
| Hot runner | The runner comes back as scrap, the cycle lengthens |
| Mold clamping | Mold changes take hours, small batches become unprofitable |
| Metal separation | Screw and barrel damage, unplanned downtime |
The weakest link in the chain determines the cycle and quality. A correctly sized machine cannot use its capacity when it works with an inadequate dryer.
When is the material decision made?
Together with the part design. The material affects both the geometry and the process: shrinkage ratio, mold temperature, drying requirement and flowability vary with the material.
For part-based material selection the engineering plastics selection guide can be used, and for numerical processing values the material processing values table. Because it directly affects holding dimension, the subject of shrinkage and dimensional stability needs to be known at the design stage — the mold is made with a shrinkage allowance.
The order when setting up from scratch
1. Clarify the part and the annual quantity. Without these two pieces of information no quotation is meaningful. 2. Determine the material. Mechanical and thermal requirements, then processability. 3. Decide on the cavity count. Quantity and cycle time are calculated together; too many cavities make the mold expensive, too few limit capacity. 4. Have the mold designed. Shrinkage allowance, gate position, cooling channels and venting are determined at this stage. 5. Choose the machine to suit the mold. Tonnage, injection volume and mold dimensions are checked together. 6. Plan the auxiliary equipment in the same budget. A link left for later comes back as cost from the first month onward. 7. Commission with a procedure. Commissioning without records means doing the same work again at every mold change — for the method, see the mold commissioning procedure.
The three most common mistakes in first production
Having the mold made before the machine is known. If the mold dimensions do not fit the existing machine, either the mold or the machine has to change — both are expensive.
Not calculating the quantity threshold. Having a mold made for a low-volume job pushes the cost per part above that of competitors and loses the business.
Loading quality onto the machine alone. Dimensional deviations, surface defects and color differences are often a problem not of the machine but of the line. For symptom-based diagnosis, the defect troubleshooting guide covers 33 defect types.
---
If the drawing, material and annual quantity of the part you want to produce are clear, we can plan the line setup together — just write to our technical support team.